Building an MCP Server That Connects to OpenAI: A Complete Developer's Guide
Learn how to develop a Model Context Protocol (MCP) server that seamlessly integrates with OpenAI’s API, enabling powerful AI-driven tool execution and intelligent automation.
MCP
OpenAI
API Integration
Development
AI Automation
The Model Context Protocol (MCP) represents a paradigm shift in how artificial intelligence systems interact with external tools and data sources. When combined with OpenAI’s powerful language models, an MCP server becomes a gateway to intelligent automation, enabling AI systems to execute complex operations, retrieve real-time data, and integrate seamlessly with your existing infrastructure. This comprehensive guide walks you through the entire process of developing an MCP server that connects to OpenAI, from foundational concepts to production-ready implementation.
Whether you’re building a customer service automation platform, an intelligent data processing system, or a sophisticated business intelligence tool, understanding how to architect and implement an MCP server is essential for modern AI development. The integration between MCP servers and OpenAI creates a powerful ecosystem where AI models can reason about problems, decide which tools to use, and execute those tools with precision—all while maintaining security, reliability, and scalability.
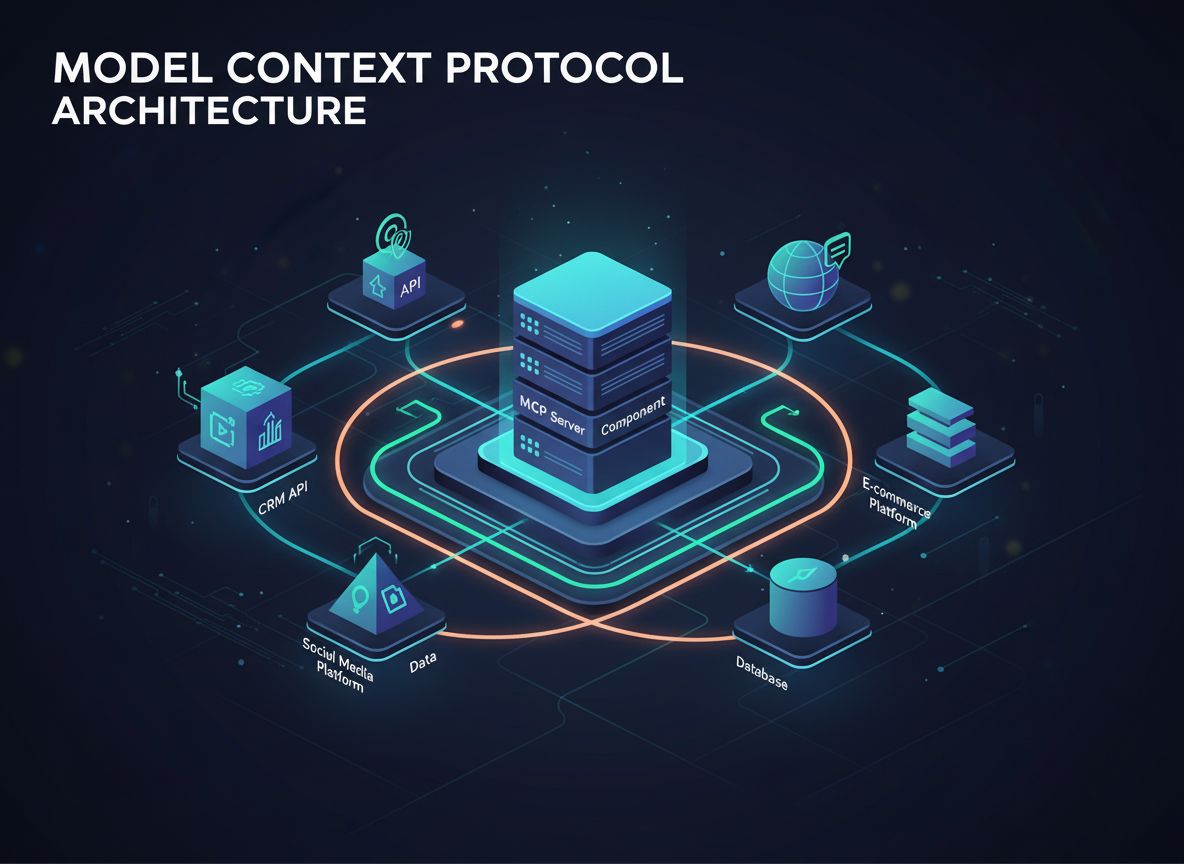
What is the Model Context Protocol (MCP)?
The Model Context Protocol is an open standard that defines how AI models can discover and interact with external tools, services, and data sources. Rather than embedding all functionality directly into an AI model, MCP allows developers to create specialized servers that expose capabilities through a standardized interface. This separation of concerns enables better modularity, security, and scalability in AI applications.
At its core, MCP operates on a simple principle: the AI model (in this case, OpenAI’s GPT) acts as an intelligent orchestrator that can understand what tools are available, determine when to use them, and interpret their results. The MCP server acts as a provider of these tools, exposing them through a well-defined API that the AI model can discover and invoke. This creates a clean contract between the AI system and your custom business logic.
The beauty of MCP lies in its flexibility. Your server can expose tools for anything—database queries, API calls to third-party services, file processing, calculations, or even triggering complex workflows. The AI model learns about these capabilities and uses them intelligently within conversations, making decisions about which tools to invoke based on the user’s request and the context of the conversation.
Ready to grow your business?
Start your free trial today and see results within days.
The integration of MCP servers with OpenAI addresses a fundamental limitation of large language models: they have a knowledge cutoff and cannot directly interact with real-time systems or proprietary data. By implementing an MCP server, you extend the capabilities of OpenAI’s models far beyond their base training, enabling them to access current information, execute business logic, and integrate with your existing systems.
Consider these practical scenarios where MCP servers prove invaluable:
Real-time Data Access: Your AI assistant can query live databases, retrieve current inventory levels, check customer information, or access real-time market data—all without the AI model needing to know the specifics of your database schema.
Business Process Automation: Complex workflows that require multiple steps, approvals, or integrations can be orchestrated by the AI model, which decides the sequence of operations based on context.
Secure Information Retrieval: Instead of embedding sensitive data in prompts, your MCP server can authenticate requests and provide only the information the AI model needs for the current task.
Cost Optimization: By offloading computation-heavy tasks to your MCP server, you reduce the token consumption of OpenAI API calls, directly impacting your operational costs.
Compliance and Governance: MCP servers allow you to implement audit logging, data masking, and access controls at the tool level, ensuring your AI applications meet regulatory requirements.
The architecture also provides significant advantages for development teams. Multiple teams can develop and maintain their own MCP servers independently, which are then composed together to create sophisticated AI applications. This modular approach scales well as your organization grows and your AI capabilities become more complex.
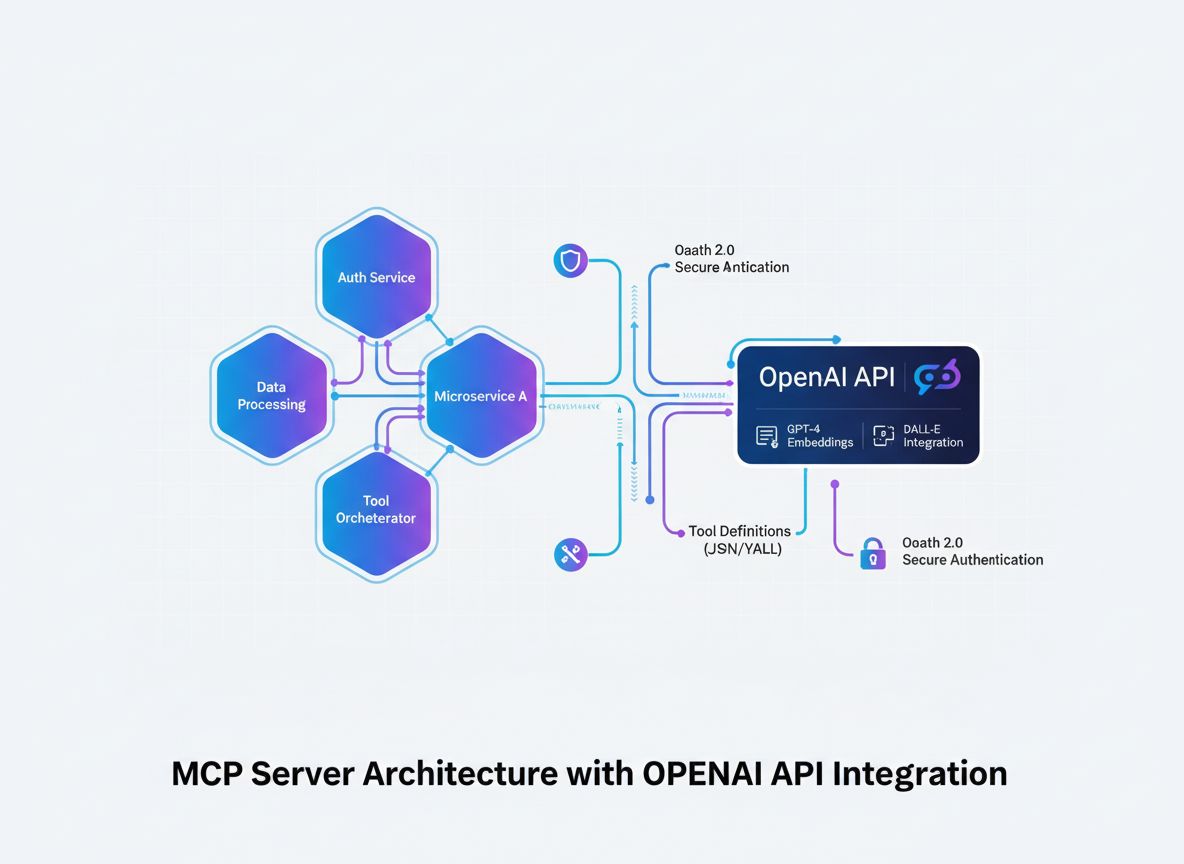
Understanding the Architecture: How MCP Servers Connect to OpenAI
Before diving into implementation details, it’s crucial to understand the architectural flow of how an MCP server integrates with OpenAI. The process involves several key components working in concert:
The AI Model (OpenAI) initiates conversations and makes decisions about which tools to invoke. When the model determines that a tool call is necessary, it generates a structured request containing the tool name and parameters.
The MCP Client acts as a translator and intermediary. It receives tool invocation requests from OpenAI, translates them into the format expected by your MCP server, sends the request to the appropriate server, and returns the results back to OpenAI in the format the model expects.
The MCP Server is your custom application that exposes tools and capabilities. It receives requests from the MCP client, executes the requested operations (which might involve database queries, API calls, or complex computations), and returns structured results.
Tool Definitions are the contracts that define what tools are available, what parameters they accept, and what they return. These definitions are discovered by the MCP client and registered with OpenAI so the model knows what’s available.
This architecture creates a clean separation of concerns: OpenAI handles reasoning and decision-making, your MCP server handles domain-specific logic and data access, and the MCP client handles the communication protocol between them.
Join our newsletter
Get latest tips, trends, and deals for free.
Step 1: Define Your MCP Tools and Capabilities
The foundation of any successful MCP server is a clear definition of the tools you want to expose. This isn’t just a technical exercise—it’s a strategic decision about what capabilities your AI system needs to accomplish its goals.
Start by identifying the specific problems your AI system needs to solve. Are you building a customer service chatbot that needs to look up order information? A data analysis assistant that needs to query databases? A content creation tool that needs to access your company’s knowledge base? Each use case will have different tool requirements.
For each tool, define:
Tool Name: A clear, descriptive identifier (e.g., get_customer_order_history, search_knowledge_base, execute_sql_query)
Description: A detailed explanation of what the tool does, written in natural language so the AI model understands when to use it
Input Parameters: The specific data the tool needs to function, including type information and validation rules
Output Format: The structure of the data the tool returns
Error Handling: How the tool communicates failures or edge cases
Here’s an example of well-defined tool specifications:
Tool Name
Purpose
Input Parameters
Output Format
Use Case
get_customer_info
Retrieve customer details
customer_id (string)
JSON object with name, email, account_status
Customer service queries
search_orders
Find orders matching criteria
customer_id, date_range, status
Array of order objects
Order lookup and history
create_support_ticket
Open a new support case
customer_id, issue_description, priority
Ticket object with ID and confirmation
Issue escalation
check_inventory
Query product availability
product_id, warehouse_location
Inventory count and location details
Stock inquiries
process_refund
Initiate refund transaction
order_id, amount, reason
Transaction confirmation with reference number
Refund processing
This table-based approach helps you think through the complete tool ecosystem before writing any code. It ensures consistency, clarity, and completeness in your tool definitions.
Step 2: Set Up Your Development Environment
Creating an MCP server requires a solid development foundation. While MCP servers can be built in multiple languages, we’ll focus on the most popular approaches: TypeScript/Node.js and Python, as these have the most mature MCP libraries and community support.
For TypeScript/Node.js Development:
Start by creating a new Node.js project and installing the necessary dependencies:
mkdir mcp-server-openai
cd mcp-server-openai
npm init -y
npm install @modelcontextprotocol/sdk openai dotenv express cors
npm install --save-dev typescript @types/node ts-node
Create a tsconfig.json file to configure TypeScript:
OpenAI API Key: Sign up at platform.openai.com and generate an API key from your account settings
Environment Configuration: Create a .env file to store sensitive credentials securely
Version Control: Initialize a Git repository to track your development
Testing Framework: Set up unit tests to validate your tool implementations
Step 3: Implement the MCP Server Core
The core of your MCP server is the server application that exposes your tools through the MCP protocol. This involves creating endpoints for tool discovery and tool execution.
from mcp.server import Server
from mcp.types import Tool, TextContent, ToolResult
import json
app = Server("openai-mcp-server")
# Define your toolsTOOLS = [
Tool(
name="get_customer_info",
description="Retrieve customer information by ID",
inputSchema={
"type": "object",
"properties": {
"customer_id": {
"type": "string",
"description": "The unique customer identifier" }
},
"required": ["customer_id"]
}
)
]
@app.list_tools()
asyncdeflist_tools():
return TOOLS
@app.call_tool()
asyncdefcall_tool(name: str, arguments: dict):
if name =="get_customer_info":
customer_id = arguments.get("customer_id")
# Implement your tool logic result = {
"id": customer_id,
"name": "John Doe",
"email": "john@example.com" }
return ToolResult(
content=[TextContent(type="text", text=json.dumps(result))]
)
return ToolResult(
content=[TextContent(type="text", text=f"Unknown tool: {name}")],
isError=True )
if __name__ =="__main__":
import uvicorn
uvicorn.run(app, host="0.0.0.0", port=8000)
Step 4: Implement Tool Logic and Business Integration
The real power of your MCP server comes from the actual implementation of your tools. This is where you connect to databases, call external APIs, process data, and execute business logic.
Database Integration Example:
import { Pool } from"pg"; // PostgreSQL example
constpool=newPool({
connectionString: process.env.DATABASE_URL,
});
asyncfunctiongetCustomerInfo(customerId: string) {
try {
constresult=awaitpool.query(
"SELECT id, name, email, account_status FROM customers WHERE id = $1",
[customerId]
);
if (result.rows.length===0) {
return {
error:"Customer not found",
status: 404,
};
}
returnresult.rows[0];
} catch (error) {
return {
error:"Database query failed",
details: error.message,
status: 500,
};
}
}
Robust error handling is critical for production MCP servers. Implement comprehensive validation and error handling:
functionvalidateInput(args: any, schema: any): { valid: boolean; error?: string } {
// Validate required fields
for (constrequiredofschema.required|| []) {
if (!(requiredinargs)) {
return { valid: false, error:`Missing required parameter: ${required}` };
}
}
// Validate field types
for (const [key, property] of Object.entries(schema.properties|| {})) {
if (keyinargs) {
constvalue=args[key];
constexpectedType= (propertyasany).type;
if (typeofvalue!==expectedType) {
return {
valid: false,
error:`Parameter ${key} must be of type ${expectedType}`,
};
}
}
}
return { valid: true };
}
Step 5: Create the MCP Client for OpenAI Integration
The MCP client is the bridge between OpenAI and your MCP server. It handles the translation between OpenAI’s function-calling format and your MCP server’s protocol.
TypeScript/Node.js MCP Client:
import { Client } from"@modelcontextprotocol/sdk/client/index.js";
import { StdioClientTransport } from"@modelcontextprotocol/sdk/client/stdio.js";
importOpenAIfrom"openai";
classMCPOpenAIBridge {
privatemcpClient: Client;
privateopenaiClient: OpenAI;
privateavailableTools: any[] = [];
constructor() {
this.openaiClient=newOpenAI({
apiKey: process.env.OPENAI_API_KEY,
});
}
asyncinitialize() {// Connect to MCP server
consttransport=newStdioClientTransport({
command:"node",
args: ["dist/server.js"],
});
this.mcpClient=newClient({
name:"openai-mcp-client",
version:"1.0.0",
});
awaitthis.mcpClient.connect(transport);
// Discover available tools
consttoolsResponse=awaitthis.mcpClient.listTools();
this.availableTools=toolsResponse.tools;
}
asyncexecuteWithOpenAI(userMessage: string) {
constmessages= [{ role:"user"asconst, content: userMessage }];
// Convert MCP tools to OpenAI function format
consttools=this.availableTools.map((tool) => ({
type:"function"asconst,
function: {
name: tool.name,
description: tool.description,
parameters: tool.inputSchema,
},
}));
letresponse=awaitthis.openaiClient.chat.completions.create({
model:"gpt-4",
messages,
tools,
});
// Handle tool calls in a loop
while (response.choices[0].finish_reason==="tool_calls") {
consttoolCalls=response.choices[0].message.tool_calls|| [];
for (consttoolCalloftoolCalls) {
consttoolName=toolCall.function.name;
consttoolArgs=JSON.parse(toolCall.function.arguments);
// Execute tool on MCP server
consttoolResult=awaitthis.mcpClient.callTool({
name: toolName,
arguments: toolArgs,
});
// Add tool result to messages
messages.push({
role:"assistant",
content: response.choices[0].message.content||"",
});
messages.push({
role:"tool",
content: JSON.stringify(toolResult),
tool_call_id: toolCall.id,
});
}
// Get next response from OpenAI
response=awaitthis.openaiClient.chat.completions.create({
model:"gpt-4",
messages,
tools,
});
}
returnresponse.choices[0].message.content;
}
}
// Usage
constbridge=newMCPOpenAIBridge();
awaitbridge.initialize();
constresult=awaitbridge.executeWithOpenAI(
"What is the order history for customer 12345?");
console.log(result);
Step 6: Implement Security and Authentication
Security is paramount when building MCP servers that interact with sensitive data and external APIs. Implement multiple layers of security:
importrateLimitfrom"express-rate-limit";
constlimiter=rateLimit({
windowMs: 15*60*1000, // 15 minutes
max: 100, // limit each IP to 100 requests per windowMs
message:"Too many requests from this IP, please try again later.",
});
app.use("/api/", limiter);
describe("MCP Server Integration", () => {
letserver: Server;
beforeAll(async () => {
server=newServer({ name:"test-server", version:"1.0.0" });
// Initialize server
});
test("should list all available tools", async () => {
consttools=awaitserver.listTools();
expect(tools.length).toBeGreaterThan(0);
expect(tools[0]).toHaveProperty("name");
expect(tools[0]).toHaveProperty("description");
});
test("should execute tool and return result", async () => {
constresult=awaitserver.callTool({
name:"get_customer_info",
arguments: { customer_id:"cust_123" },
});
expect(result).toBeDefined();
});
});
Leveraging FlowHunt for MCP Server Development and Deployment
FlowHunt provides a comprehensive platform for automating the entire lifecycle of MCP server development, testing, and deployment. Rather than manually managing each step of your MCP server workflow, FlowHunt enables you to create intelligent automation flows that handle repetitive tasks and ensure consistency across your development process.
Automated Testing and Validation:
FlowHunt can orchestrate your testing pipeline, running unit tests, integration tests, and end-to-end tests automatically whenever you commit code. This ensures that your MCP server tools are always functioning correctly before they’re deployed to production.
Continuous Integration and Deployment:
Set up FlowHunt workflows to automatically build, test, and deploy your MCP server whenever changes are pushed to your repository. This eliminates manual deployment steps and reduces the risk of human error.
Monitoring and Alerting:
FlowHunt can monitor your MCP server’s health, track API response times, and alert you to any issues. If a tool starts failing or performance degrades, you’ll be notified immediately so you can take action.
Documentation Generation:
Automatically generate API documentation for your MCP server tools, keeping your documentation in sync with your actual implementation. This ensures developers always have accurate, up-to-date information about available tools.
Performance Optimization:
FlowHunt’s analytics help you identify bottlenecks in your tool execution. You can see which tools are called most frequently, which ones have the highest latency, and where optimization efforts would have the most impact.
Step 8: Deploy Your MCP Server to Production
Deploying an MCP server to production requires careful planning and execution. Consider these deployment strategies:
Docker Containerization:
Create a Dockerfile for your MCP server:
FROMnode:18-alpineWORKDIR/appCOPY package*.json ./RUN npm ci --only=productionCOPY dist ./distEXPOSE8000CMD ["node", "dist/server.js"]
As your MCP server grows in complexity, consider these advanced patterns:
Tool Composition:
Create higher-level tools that compose multiple lower-level tools:
asyncfunctionprocessCustomerRefund(customerId: string, orderId: string, amount: number) {
// Get customer info
constcustomer=awaitgetCustomerInfo(customerId);
// Get order details
constorder=awaitgetOrderDetails(orderId);
// Verify order belongs to customer
if (order.customerId!==customerId) {
thrownew Error("Order does not belong to customer");
}
// Process refund
constrefund=awaitcreateRefund(orderId, amount);
// Send notification
awaitsendNotification(customer.email, `Refund of $${amount} processed`);
returnrefund;
}
Caching Strategy:
Implement caching to reduce latency and API calls:
importNodeCachefrom"node-cache";
constcache=newNodeCache({ stdTTL: 600 }); // 10 minute TTL
asyncfunctiongetCustomerInfoWithCache(customerId: string) {
constcacheKey=`customer_${customerId}`;
// Check cache first
constcached=cache.get(cacheKey);
if (cached) {
returncached;
}
// Fetch from database
constcustomer=awaitgetCustomerInfo(customerId);
// Store in cache
cache.set(cacheKey, customer);
returncustomer;
}
Async Job Processing:
For long-running operations, implement async job processing:
Building an MCP server that connects to OpenAI represents a significant step forward in creating intelligent, integrated AI applications. By following the architectural patterns, implementation strategies, and best practices outlined in this guide, you can create robust, scalable MCP servers that extend OpenAI’s capabilities far beyond their base training.
The key to success lies in careful planning of your tool definitions, thorough implementation of security measures, comprehensive testing, and continuous monitoring in production. Start with a simple set of tools, validate that they work correctly with OpenAI, and gradually expand your server’s capabilities as you gain confidence and experience.
Remember that your MCP server is not a static artifact—it’s a living system that will evolve as your business needs change and as you discover new ways to leverage AI in your operations. Build with modularity and extensibility in mind, document your tools thoroughly, and maintain clear separation between your business logic and the MCP protocol implementation.
The combination of MCP servers and OpenAI’s powerful language models creates unprecedented opportunities for automation, intelligence, and integration. By mastering this technology, you position yourself and your organization at the forefront of AI-driven innovation.
Supercharge Your MCP Server Development with FlowHunt
Automate your MCP server development, testing, and deployment workflows. From continuous integration to production monitoring, FlowHunt streamlines every step of your AI development lifecycle.
The Model Context Protocol is a standardized framework that enables AI models like OpenAI's GPT to discover, understand, and execute tools and functions provided by external servers. It acts as a bridge between AI models and custom business logic.
You need a valid OpenAI API key with appropriate permissions. The MCP server itself doesn't require special permissions from OpenAI—it communicates through standard API calls. However, you should implement proper authentication and authorization on your MCP server.
MCP servers can be built in any language that supports HTTP/REST APIs or WebSocket connections. Popular choices include Python, TypeScript/Node.js, Java, C#/.NET, and Go. The language choice depends on your existing infrastructure and team expertise.
Implement rate limiting on your MCP server side, cache frequently requested results, use exponential backoff for retries, and monitor your OpenAI API usage. Consider implementing a queue system for tool requests to manage load effectively.
Arshia is an AI Workflow Engineer at FlowHunt. With a background in computer science and a passion for AI, he specializes in creating efficient workflows that integrate AI tools into everyday tasks, enhancing productivity and creativity.
Arshia Kahani
AI Workflow Engineer
Automate Your MCP Server Workflows with FlowHunt
Streamline your MCP server development, testing, and deployment with FlowHunt's intelligent automation platform.
MCP Server Examples: Building Intelligent Integrations for AI Agents
Explore comprehensive MCP server examples and learn how to build, deploy, and integrate Model Context Protocol servers to enhance AI agent capabilities across e...
Learn how to build and deploy a Model Context Protocol (MCP) server to connect AI models with external tools and data sources. Step-by-step guide for beginners ...
What is an MCP Server? A Complete Guide to Model Context Protocol
Learn what MCP (Model Context Protocol) servers are, how they work, and why they're revolutionizing AI integration. Discover how MCP simplifies connecting AI ag...
18 min read
AI
Automation
+3
Cookie Consent We use cookies to enhance your browsing experience and analyze our traffic. See our privacy policy.