
Hosted MCP Server for Bexio
Integrate Bexio business management software with FlowHunt through MCP to manage contacts, invoices, quotes, projects, and business operations seamlessly. Autom...
6 min read
Bexio
Business Management
+7

Connect your Bitrix24 CRM to FlowHunt for intelligent customer relationship management and automated sales workflows.
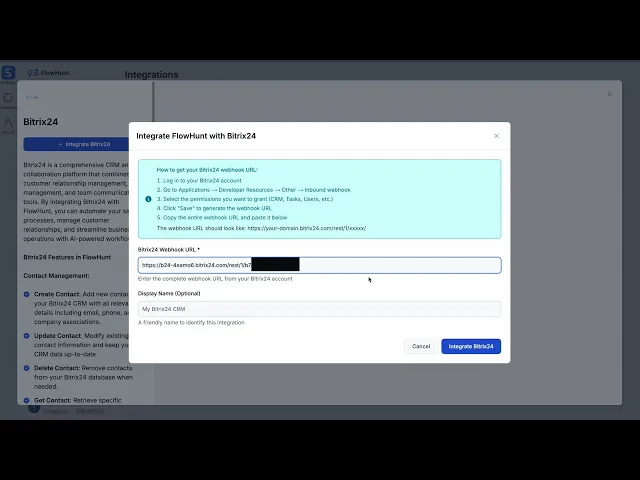
The webhook URL should look like: https://your-domain.bitrix24.com/rest/1/xxxxx/
💡 Pro Tip: Store your webhook URL securely and avoid sharing it publicly. Using environment variables for webhook URL management is recommended for enhanced security.
MCP INTEGRATION
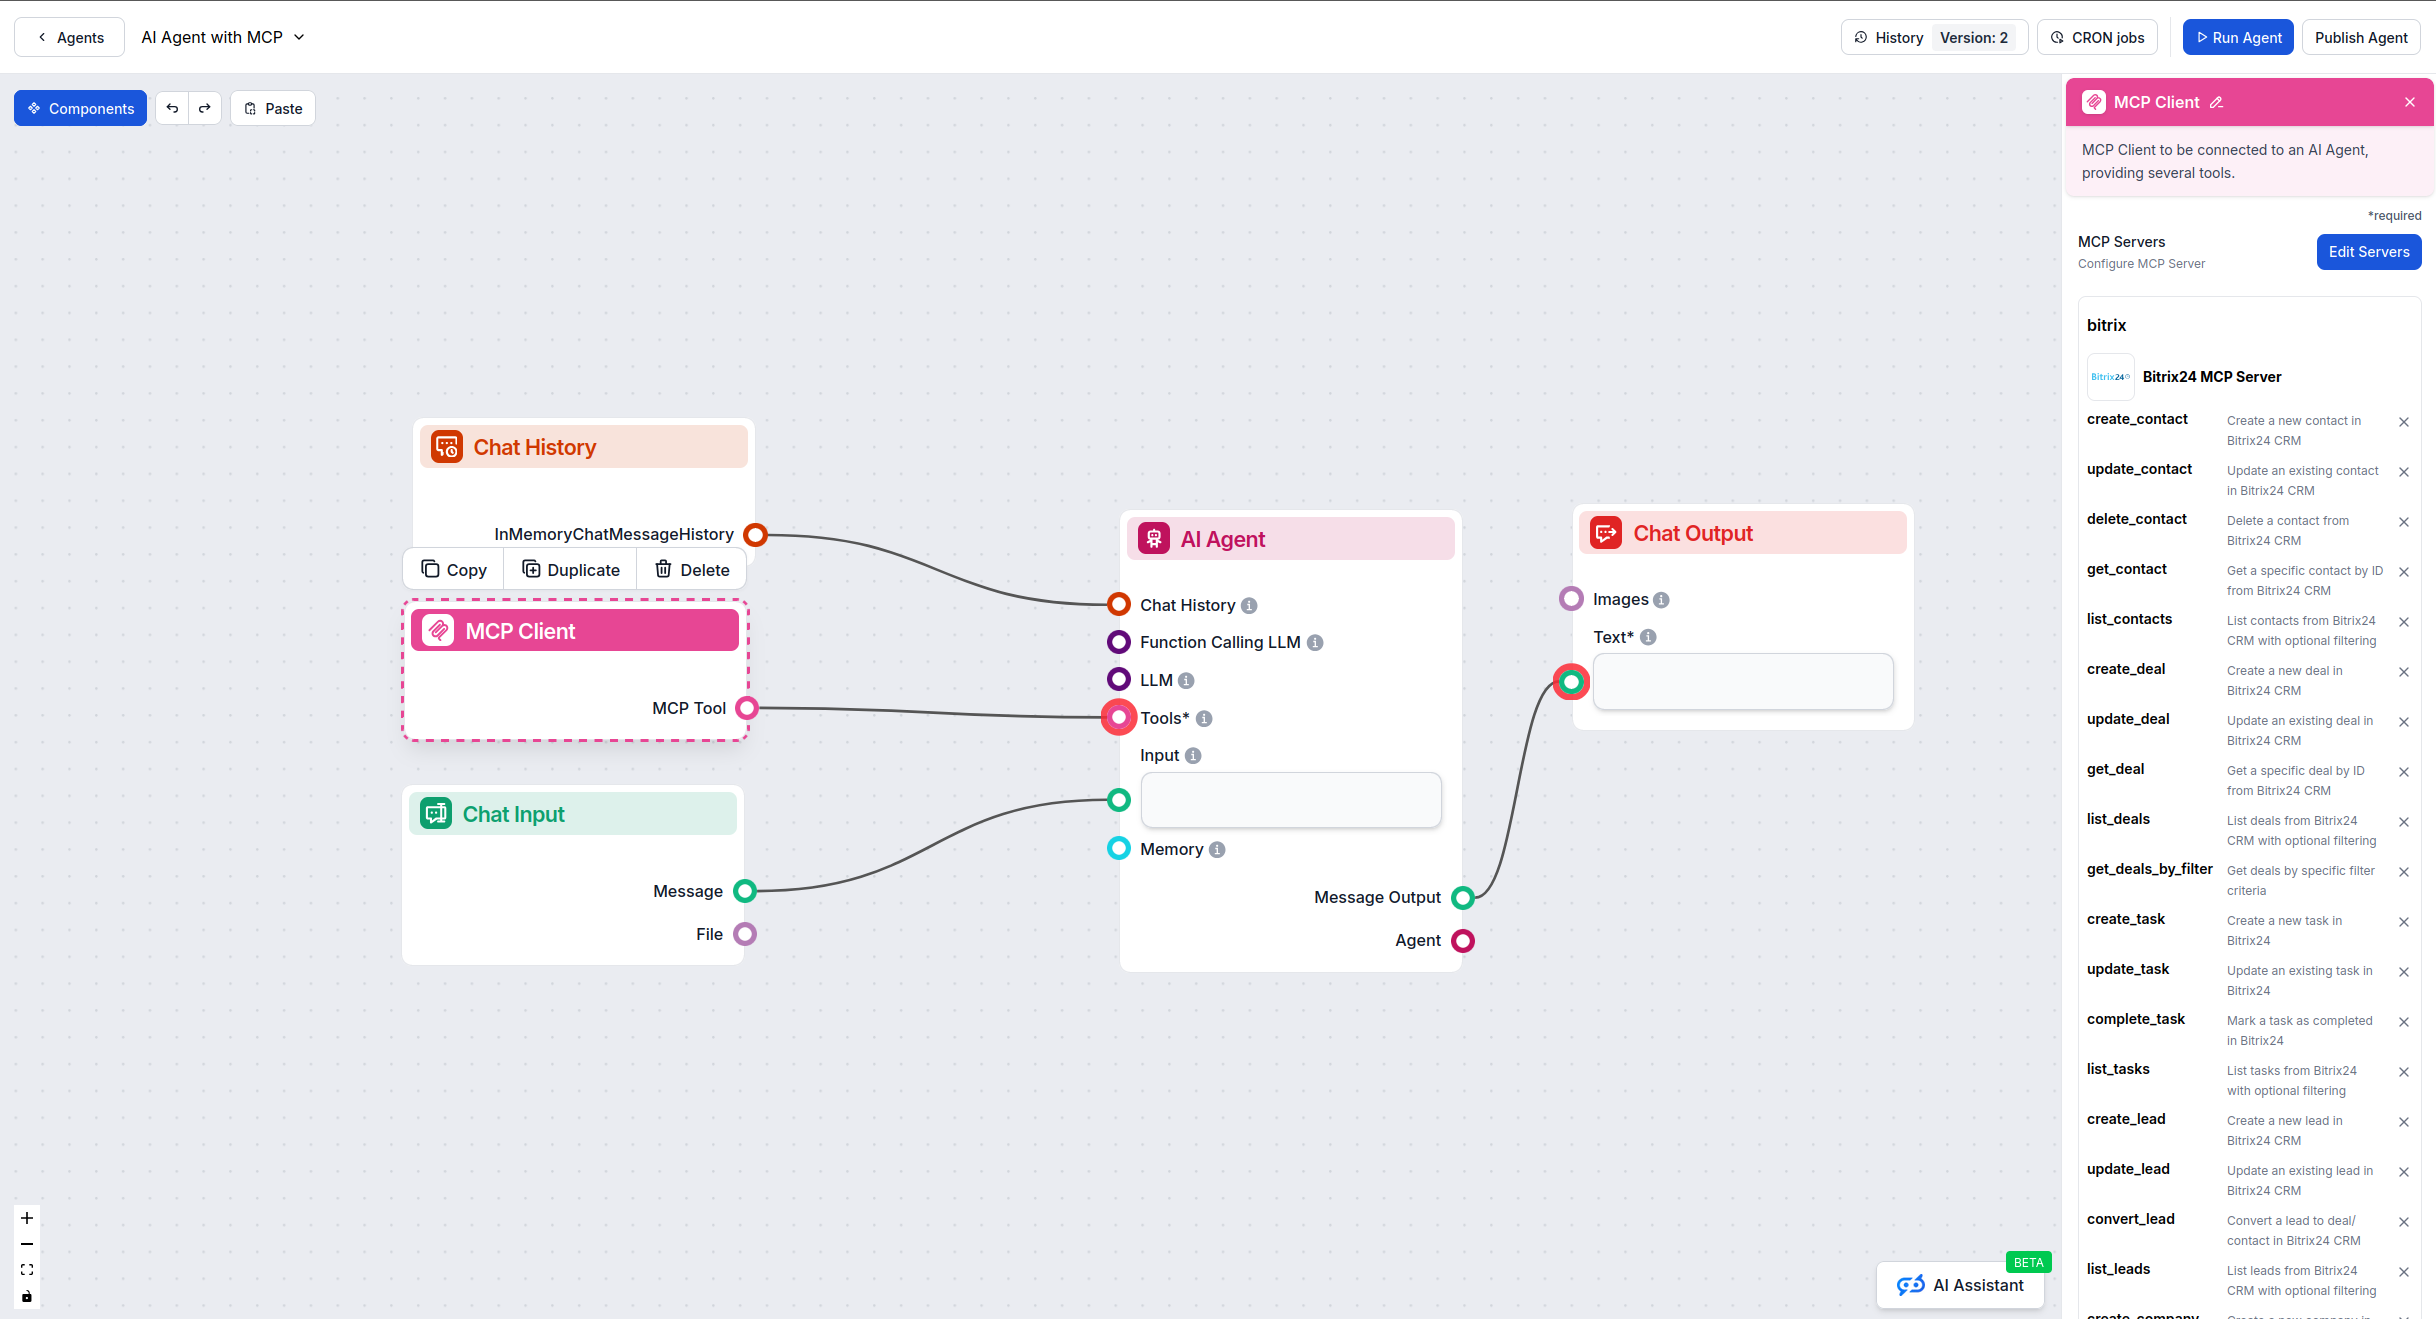
The following tools are available as part of the Bitrix24 MCP integration:
Create a new contact in Bitrix24 CRM.
Update an existing contact in Bitrix24 CRM.
Delete a contact from Bitrix24 CRM.
Get a specific contact by ID from Bitrix24 CRM.
List contacts from Bitrix24 CRM with optional filtering.
Create a new deal in Bitrix24 CRM.
Update an existing deal in Bitrix24 CRM.
Get a specific deal by ID from Bitrix24 CRM.
List deals from Bitrix24 CRM with optional filtering.
Get deals by specific filter criteria.
Create a new task in Bitrix24.
Update an existing task in Bitrix24.
Mark a task as completed in Bitrix24.
List tasks from Bitrix24 with optional filtering.
Create a new lead in Bitrix24 CRM.
Update an existing lead in Bitrix24 CRM.
Convert a lead to deal/contact in Bitrix24 CRM.
List leads from Bitrix24 CRM with optional filtering.
Create a new company in Bitrix24 CRM.
Update an existing company in Bitrix24 CRM.
Get a specific company by ID from Bitrix24 CRM.
List companies from Bitrix24 CRM with optional filtering.
Get current user information from Bitrix24.
List users from Bitrix24.
Add an activity (call, meeting, email, etc.) to Bitrix24 CRM.
List activities from Bitrix24 CRM.
Search for entities (contacts, deals, leads, companies, tasks) in Bitrix24 CRM.
Get sales metrics and analytics from Bitrix24 CRM.
📝 Note: You can modify or add tools later based on your evolving automation needs.
Start your free trial today and see results within days.
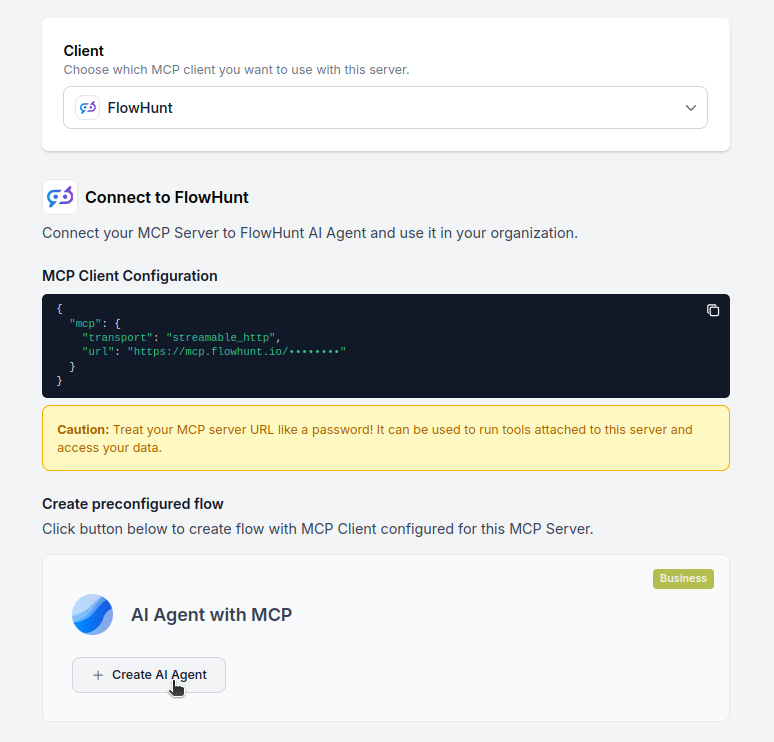
{
  "mcp": {
    "transport": "streamable_http",
    "url": "https://mcp.flowhunt.io/••••••••"
  }
}
🔒 Important: Treat your MCP server URL as a password. It provides direct access to your Bitrix24 CRM data and server tools. Never share it publicly or commit it to version control.
You have two powerful options for implementing your Bitrix24 automation:
Best for: Getting started quickly with proven automation patterns
Generate Flow: In your MCP Server configuration, click “Create Preconfigured Flow”.
Select Template: Choose “AI Agent with MCP” to create a ready-to-use workflow.
Customize Logic: Use FlowHunt’s visual flow builder to tailor the automation:
Activate: Save and activate your flow to begin automated operations.
Best for: Specific automation requirements or existing workflow enhancement
{
  "mcp": {
    "transport": "streamable_http",
    "url": "https://mcp.flowhunt.io/••••••••"
  }
}
Design Workflow: Create custom logic that leverages the MCP server tools:
Deploy: Save your configuration and activate the flow.
Get latest tips, trends, and deals for free.
Here are practical examples demonstrating how to use the Bitrix24 MCP Server with your AI agents. These prompts showcase real-world CRM and sales automation scenarios:
Create a new contact in Bitrix24 for 'Sarah Johnson' with email sarah.johnson@example.com, phone +1-555-0123, and company 'Tech Innovations Inc'
List all contacts that were created in the last 7 days and have 'Hot Lead' status
Update contact ID 456 to change their position to 'Senior Manager' and add notes about our last meeting
Find all contacts from companies in the technology sector who haven't been contacted in the last 30 days
Delete the duplicate contact entry for ID 789 that was created by mistake
Create a new deal called 'Enterprise Software License for Acme Corp' with value $50,000 in stage 'Proposal Sent'
List all deals in the 'Negotiation' stage that have a close date within the next 14 days
Update deal ID 234 to move it to 'Contract Signed' stage and set the close date to today
Get all deals with value over $100,000 that were created this quarter and show me their current probability of closing
Search for deals associated with contact 'Michael Chen' to review the full customer relationship history
Create a new lead for 'Global Manufacturing Solutions' with source 'Website Form' and assign it to sales rep John Smith
List all unqualified leads from the last 30 days that need follow-up and prioritize by potential value
Update lead ID 567 to change status to 'Qualified' and add notes from the qualification call
Convert lead ID 890 to a contact and automatically create a new deal with estimated value $25,000
Create a follow-up task for contact ID 123 titled 'Send proposal document' with deadline tomorrow at 2 PM
List all overdue tasks assigned to my team members and show their priority levels
Update task ID 345 to mark it as completed and add completion notes
Complete task ID 678 and automatically create a new follow-up task for next week
Create a new company record for 'Digital Marketing Pros LLC' with industry 'Marketing', employee count 50, and annual revenue $5M
List all companies that have active deals worth more than $75,000 and show their total pipeline value
Update company ID 901 to add their new office address and updated contact information
Get detailed information about company ID 234 including all associated contacts, deals, and activity history
Add a new call activity to contact ID 456 logging a 30-minute discovery call with outcome 'Interested in Q2 implementation'
List all email activities from the last 5 business days that haven't received a response
Create a meeting activity for deal ID 789 scheduled for next Tuesday at 10 AM with attendees from both companies
Get sales metrics for the current quarter including total deal value, win rate, and average deal size by sales rep
Show me the conversion rate from leads to deals for the last 90 days broken down by lead source
Search across all CRM entities for mentions of 'contract renewal' to identify upcoming opportunities
Get current user information including assigned territories, team membership, and CRM permissions
List all users in the sales department and show their current deal load and task completion rate
These prompts demonstrate how Bitrix24 MCP integration enables comprehensive CRM automation, from lead management and sales pipeline tracking to team collaboration and performance analytics.
Integrating Bitrix24 MCP Server with FlowHunt.io creates a powerful foundation for intelligent CRM automation. Whether you’re streamlining lead management, automating deal tracking, or enhancing customer relationship workflows, this integration empowers your AI agents to work seamlessly with your critical CRM data.
Start with a simple automation and gradually expand your workflows as you become more comfortable with the platform. The combination of Bitrix24’s robust CRM capabilities and FlowHunt’s AI-driven automation will transform how your team manages customer relationships and sales processes.
Ready to get started? Begin your integration today and unlock the full potential of AI-powered CRM automation!
💡 Pro Tip: Store your webhook URL securely and avoid sharing it publicly. Using environment variables for webhook URL management is recommended for enhanced security.
FlowHunt provides an additional security layer between your internal systems and AI tools, giving you granular control over which tools are accessible from your MCP servers. MCP servers hosted in our infrastructure can be seamlessly integrated with FlowHunt's chatbot as well as popular AI platforms like ChatGPT, Claude, and various AI editors.
Start managing your customer relationships intelligently with AI-powered automation and seamless Bitrix24 CRM integration.
Integrate Bexio business management software with FlowHunt through MCP to manage contacts, invoices, quotes, projects, and business operations seamlessly. Autom...

Integrate FlowHunt with Bitrix24 to automate CRM workflows, manage leads, deals, contacts, and tasks with AI—no coding required.

Learn how to integrate FlowHunt with PowerBI, configure observability settings, and visualize your FlowHunt workspace metrics directly in PowerBI dashboards.
Cookie Consent
We use cookies to enhance your browsing experience and analyze our traffic. See our privacy policy.